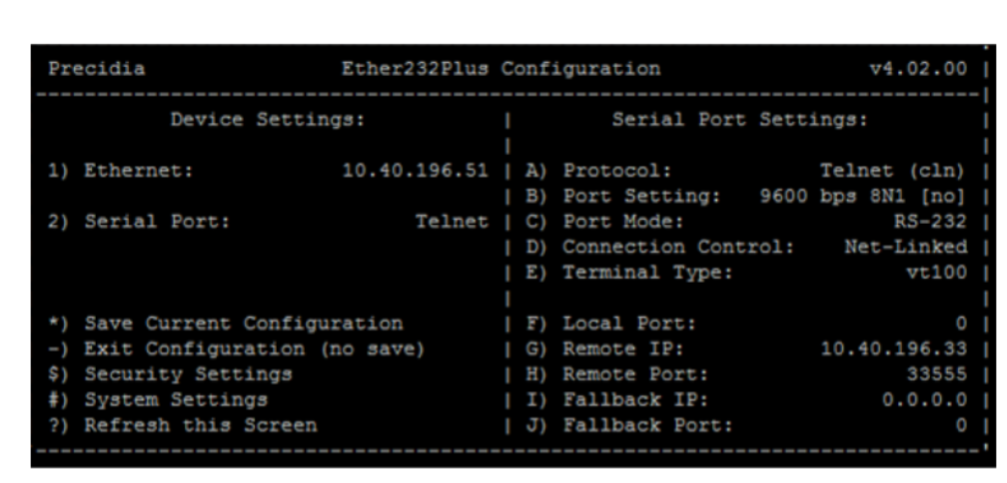
The Precidia iPocket232 is an Ethernet-to-serial converter commonly used to interface Mitel systems with Property Management Systems (PMS) or for capturing call records through SMDR (Station Message Detail Recording). The following steps outline the configuration process for setting up the Precidia iPocket232 with a Mitel MiVoice Office 470 system.
1. Initial Configuration Setup
To begin the setup, you will need to access the configuration mode of the Precidia iPocket232 device:
- Enter Configuration Mode:
- Press the reset button on the Precidia iPocket232 for a few seconds to enter configuration mode. The default configuration menu will appear on the screen.
- Default Settings:
- The Precidia iPocket232 typically defaults to a serial configuration of 9600 baud rate, 8 data bits, no parity, and 1 stop bit (9600 8N1). These settings can be adjusted based on the PMS or SMDR requirements.
2. Configuring the Ethernet Interface
The next step involves setting up the Ethernet connection, which allows the Precidia to communicate with the network and the Mitel system:
- Select Ethernet Configuration:
- From the main menu, select Option 1 for Ethernet configuration.
- Assign IP Address:
- Use the A-B-C options to assign the IP address, subnet mask, and gateway for the Precidia iPocket232. The IP address you assign must match the IP address designated for the PMS or SMDR interface in the Mitel system.
3. Serial Port Configuration
After configuring the Ethernet settings, you need to set up the serial port to ensure proper communication with the PMS or SMDR system:
- Select Serial Port Configuration:
- Choose Option 2 for Serial Port configuration from the main menu.
- Telnet (A):
- Set the Telnet mode to client (cln) by selecting Option A.
- Port Settings (B):
- Adjust the serial port settings (baud rate, data bits, parity, stop bits) according to the requirements provided by the PMS or SMDR system. Typically, these will be aligned with the default settings of 9600 8N1 unless specified otherwise by the PMS vendor.
- Netlinked (D):
- Configure the device to use Netlinked mode by selecting Option D.
- Assign Mitel IP and Port (G & H):
- Enter the IP address of the Mitel system under Option G.
- Assign the port number that was configured in the Mitel system for PMS or SMDR under Option H.
4. Saving the Configuration
Once all the settings have been configured, it’s important to save them to ensure they persist after a reboot:
- Save Settings:
- Press Shift + 8 on your keyboard to save all the changes made in the Precidia iPocket232 configuration.
5. Verifying the Connection
After completing the setup, you should verify that the connection between the Precidia iPocket232 and the Mitel system is active:
- Check the Connection:
- If the Precidia is correctly connected to the MiVoice Office 470 via Ethernet, your programming PC should display a successful connection. This confirms that the Precidia is communicating with the Mitel system.
6. Setting Up SMDR (If Applicable)
If you are setting up the Precidia iPocket232 for SMDR:
- SMDR Configuration in Mitel:
- Navigate to Configuration > Charges > General in the Mitel system interface.
- Set the service to active for incoming, outgoing, or both types of calls.
- Ensure the IP address and TCP port match the Precidia iPocket232 settings.
- Test SMDR Output:
- If everything is set up correctly, the Mitel system should start sending SMDR data through the Precidia iPocket232 to the designated IP address and port.
Conclusion
By following these steps, you can successfully configure the Precidia iPocket232 Ethernet-to-serial converter to work with a Mitel MiVoice Office 470 system for PMS or SMDR integration. Proper configuration of IP addresses, ports, and serial settings is crucial for ensuring seamless communication between the devices. If any issues arise during the setup, double-check the configuration settings and verify that all cables and connections are secure.

