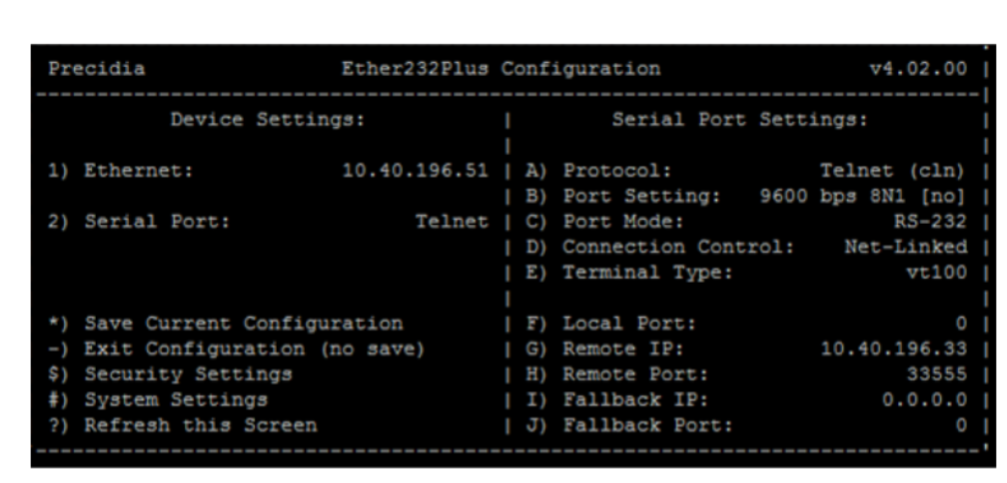
The Precidia iPocket232 is an Ethernet-to-serial conversion unit used to connect external systems like Property Management Systems (PMS) or call accounting systems with the Mitel SX-200 PBX, especially when those external systems do not support Telnet connectivity. The following guide will walk you through the process of setting up the Precidia iPocket232 for use with a Mitel SX-200 system.
1. Gather Necessary Equipment and Information
Before starting, ensure you have the following:
- A communications program set to 9600 baud rate, 8 data bits, no parity, and 1 stop bit (9600 8N1).
- A straight-through serial cable (for iPocket232).
- The IP address of your SX-200 ICP.
- The IP address you plan to use for the Precidia iPocket232 unit.
- The Telnet socket programmed as your device in Form 12 of the SX-200.
2. Initial Setup of the Precidia iPocket232
To begin the setup:
- Connect the Serial Cable:
- Connect the straight-through serial cable to the DB9 connector on the Precidia iPocket232.
- Enter Configuration Mode:
- Press and hold the recessed button located beneath the “Configure” label on the Precidia unit to enter configuration mode. The configuration screen will appear.
- Start Ethernet Setup:
- Select Option 1 from the menu to begin configuring the Ethernet settings.
3. Configuring the Ethernet Settings
To enable network communication:
- Assign IP Address:
- Select Option A and input the IP address you want to use for the Precidia iPocket232.
- Set Subnet Mask:
- Select Option B and enter the subnet mask, typically 255.255.255.0.
- Set Network Gateway:
- Select Option C and input the network gateway address. This is usually the IP address of the network’s gateway router.
4. Serial Port Configuration
The serial port needs to be set up to interface with the Mitel SX-200 system:
- Select Serial Port Configuration:
- Choose Option 2 from the main menu to configure the serial port.
- Set Telnet Protocol:
- Select Option A and then press C followed by 2 to set the serial port to interface as a Telnet TCP-Client.
- Configure RS-232 Parameters:
- Select Option B to adjust the RS-232 settings. Choose the appropriate options based on your system requirements, typically 9600 8N1.
- Set Connection Control to Net-Link:
- Select Option C and choose Option A to enable Net-Link mode.
- Terminal Type:
- Select Option D and enter your desired terminal type, such as VT100.
- Enter Mitel IP and Socket Number:
- Select Option G and input the IP address of the SX-200 ICP.
- Select Option H and enter the socket number associated with the PLID you used in Form 12 of the SX-200 PBX. For example, if using 1/13/22, enter socket number 61322.
5. Saving the Configuration
Once all settings are configured:
- Save Settings:
- Press Shift + 8 to save the configuration. This ensures that all changes are retained even after a power cycle.
6. Testing the Connection
To verify that everything is set up correctly:
- Test the Connection:
- You can test the connection using the same communications program used to configure the Precidia. Assign Data Print or SMDR in Form 34 of the SX-200 to the DN used in Form 12, initiate a data print, and verify the output on your PC.
- Telnet Connectivity Test:
- If the test fails, power off the Precidia unit, assign the IP address to your laptop, and move the Ethernet cable to your laptop. Then, initiate a Telnet session from a command prompt:
telnet [Precidia IP] [socket number]- Ping Test:
- If the Telnet connection fails, try pinging the ICP from your laptop to ensure network connectivity.
Conclusion
Setting up the Precidia iPocket232 for the Mitel SX-200 involves careful configuration of both the Ethernet and serial port settings. By following the steps outlined above, you can ensure that your Precidia unit is properly configured to interface with the SX-200 for reliable communication with external systems. If any issues arise, recheck the configuration settings and test the connections as described.

