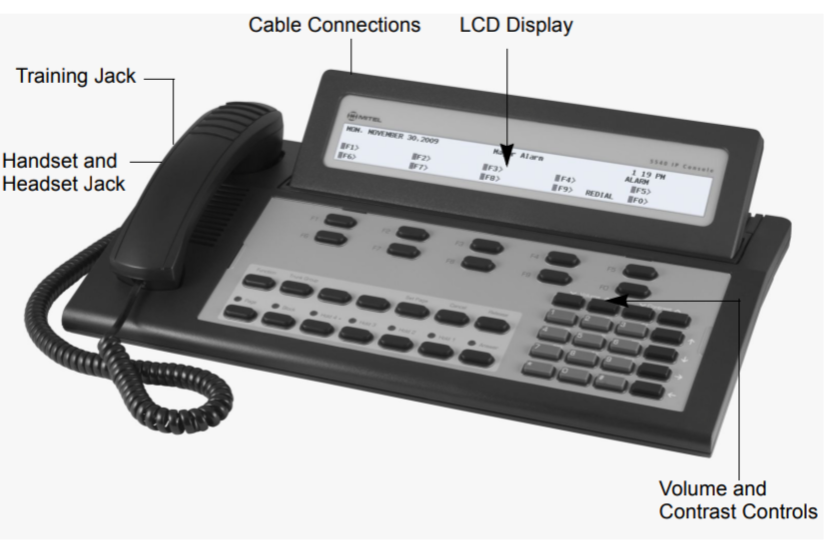
The 5540 IP Console by Mitel is a sophisticated tool that can be customized to fit the specific needs of your organization. Properly adjusting the console ensures that it operates efficiently and suits the preferences of its users. This guide provides step-by-step instructions on how to adjust various aspects of the console, including audio settings, display brightness, and more.
Table of Contents
1. Adjusting the Ringer Volume
The ringer volume is crucial in ensuring that incoming calls are noticed promptly, especially in busy environments.
Steps to Adjust the Ringer Volume:
- During an Incoming Call: To adjust the ringer volume while the console is ringing, press the Volume Up (Volume ⬆) or Volume Down (Volume ⬇) button on the console.
- While Idle: You can also adjust the volume when the console is idle by pressing the volume buttons. This setting will be retained for future calls.
Repeat the process until the ringer volume is set to your preferred level.
2. Adjusting the Handset and Headset Receiver Volume
Both the handset and headset volumes can be adjusted to ensure clear communication during calls.
Steps to Adjust the Handset/Headset Volume:
- During a Call: While on a call, use the Volume Up (Volume ⬆) or Volume Down (Volume ⬇) button to adjust the audio level.
- Single Adjustment for Both Devices: Note that any volume adjustment will apply to both the handset and the headset simultaneously.
Warning: Continuous exposure to high volume levels can lead to hearing loss. Ensure the volume is set at a comfortable level.
3. Adjusting the Display Contrast and Brightness
The visibility of the console’s display is essential for efficient operation, especially in varying lighting conditions.
Steps to Adjust Display Contrast:
- Press the Contrast Up (Contrast ⬆) button to increase contrast.
- Press the Contrast Down (Contrast ⬇) button to decrease contrast.
Steps to Adjust Display Brightness:
- Activate Brightness Control: Hold down the Function key.
- Adjust Brightness: While holding the Function key, use the Contrast Up (Contrast ⬆) and Contrast Down (Contrast ⬇) buttons to increase or decrease the brightness.
- Finalize Settings: Release the Function key when you reach the desired brightness level.
4. Turning the Console Ringer On or Off
In some scenarios, it may be necessary to turn the console ringer off, such as during meetings or in quiet environments.
Steps to Toggle the Ringer:
- Press the Function key.
- Use the softkey labeled [Bell Off] to turn the ringer off or [Bell On] to turn it back on.
When the ringer is off, the console will indicate incoming calls with a flashing Answer key and a Call Waiting (C/W) indicator on the display, instead of ringing.
5. Switching Between Night and Day Service Modes
The console can be set to different modes depending on the time of day, routing calls accordingly.
Steps to Switch to Night/Day Service:
- Press the Function key.
- Press [Att Function] to access attendant functions.
- Press [Chg Service].
- Select [Night 1], [Night 2], or [Day] as required.
Note: The night service status will be displayed on the console screen when activated.
6. Setting the Console Language
The 5540 IP Console supports multiple languages for its interface.
Steps to Change the Language:
- Press the Function key.
- Press [Att Function].
- Press [Language].
- Select the preferred language from the available options.
7. Programming Firmkeys
Firmkeys can be customized to provide quick access to frequently used functions, enhancing the efficiency of console operations.
Steps to Program Firmkeys:
- Press the Function key.
- Press [Att Function].
- Press [Firmkeys].
- Select a blank Firmkey to program by pressing it repeatedly until the desired function appears.
- Press [Save] to confirm the selection.
- Repeat for other Firmkeys as needed.
Conclusion
Adjusting the 5540 IP Console to meet the specific needs of your organization ensures that it operates efficiently and effectively. By customizing settings such as ringer volume, display brightness, and programming Firmkeys, you can enhance the functionality and user experience of the console. Following these steps will help you optimize the console for your work environment, making daily operations smoother and more efficient.

