The Mitel SX-200 IP Communications Platform (ICP) includes a robust voicemail system designed to manage voice communications efficiently within organizations. This guide provides an in-depth overview of the SX-200 voicemail system, covering its setup, key features, and detailed instructions on how to use various functions to enhance your communication experience.
Table of Contents
1. Setting Up Voicemail for the First Time
Before you can begin using your voicemail, you’ll need to complete the initial setup. This process involves creating a personalized passcode, recording your name, and setting up a greeting.
1.1. Accessing the Voicemail System
- Lift the handset or use hands-free dialing.
- Dial the Message Center extension or press the Message key on your phone.
- The system will prompt you to enter your default passcode.
1.2. Changing the Default Passcode
- After entering the default passcode, the system will prompt you to create a new passcode.
- Enter a new passcode that matches the required length.
- Re-enter the new passcode when prompted to confirm it.
1.3. Recording Your Name
- The system will prompt you to record your name.
- Speak your name clearly after the tone and press any key to stop recording.
- Press
#to accept,1to review, or2to discard and re-record your name.
1.4. Setting Up Your Greeting
- The system will prompt you to record your greeting. This is what callers will hear when they reach your voicemail.
- After recording, press any key to stop, and the system will play back your greeting.
- Press
#to accept,1to review, or2to discard and re-record.
Note: It’s advisable to prepare a professional and concise greeting to ensure clear communication with callers.
2. Accessing and Managing Voicemail Messages
Once your voicemail is set up, you can begin receiving and managing your messages.
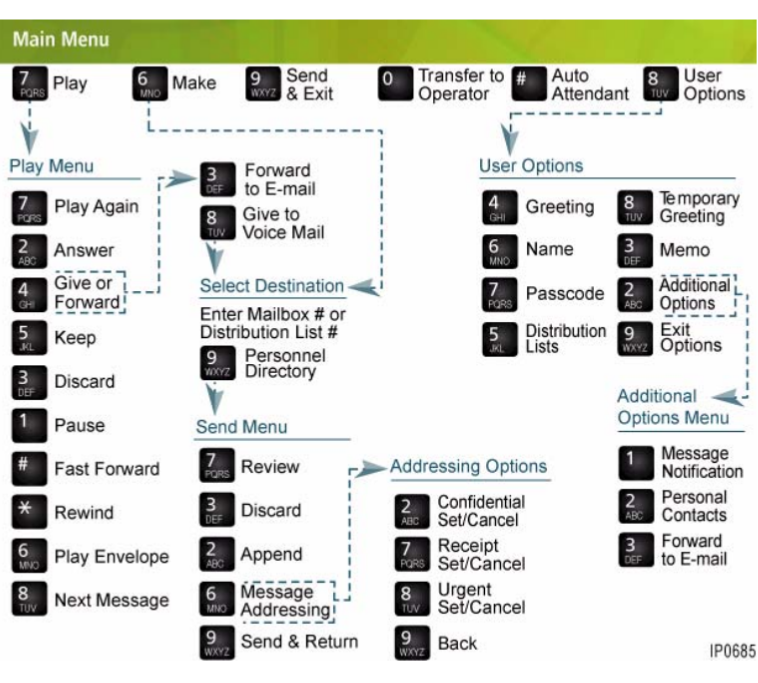
2.1. Checking Voicemail Messages
To check your messages, follow these steps:
- Press the Message key or dial the Message Center extension.
- Enter your passcode when prompted.
- Press
1to play your messages, or choose another option from the Main Menu.
2.2. Listening to Messages
While listening to a message, you can perform several actions:
- Play Again: Repeat the current message by pressing
1. - Answer: Send a response to the sender by pressing
2. - Forward: Send the message to another mailbox or forward it to an email by pressing
3. - Save: Keep the message and play the next one by pressing
4. - Delete: Remove the message permanently by pressing
5.
2.3. Calling for Messages from Outside
To check messages from outside the office:
- Call your company’s Automated Attendant number or your extension number.
- When you hear your greeting, press
*to access the voicemail system. - Enter your mailbox number followed by your passcode.
3. Making and Sending Voicemail Messages
The voicemail system allows you to create and send messages directly to other users within your organization.
3.1. Recording and Sending a Message
- From the Main Menu, press
2to send a message. - Enter the destination mailbox number(s).
- Record your message after the tone.
- Choose from the following options:
- Review: Listen to the recorded message.
- Discard: Delete the message and re-record.
- Send: Send the message to the specified mailbox.
3.2. Using Distribution Lists
For sending messages to multiple recipients:
- Access your mailbox and press
4for User Options. - Press
3for Distribution Lists. - Enter a list number and add mailbox numbers to the list.
4. Customizing Voicemail Settings
The SX-200 voicemail system allows users to customize several settings to match their preferences.
4.1. Updating Mailbox Greetings
You can change your mailbox greetings at any time:
- Press
4for User Options from the Main Menu. - Press
1for Greeting options. - Record a new greeting and save it.
4.2. Setting Temporary Greetings
Temporary greetings are useful for specific situations, such as when you’re on vacation or out of the office.
- Press
4for User Options. - Press
2for Temporary Greeting. - Record the greeting and specify the number of days it should be active.
4.3. Changing Your Passcode
To change your passcode for security reasons:
- Press
4for User Options. - Press
2for Passcode. - Enter a new passcode and confirm it.
5. Advanced Voicemail Features
The SX-200 voicemail system includes advanced features that enhance functionality.
5.1. Message Notification
The system can notify you of new messages at an external number or pager:
- Press
4for User Options. - Press
5for Message Notification. - Choose when and where to be notified.
5.2. Forwarding Voicemail to Email
You can have your voicemail messages forwarded to your email:
- Press
4for User Options. - Press
6for Forward to Email. - Set your preferences for forwarding messages.
6. Conclusion
The Mitel SX-200 voicemail system is a powerful tool for managing voice communications efficiently within an organization. By understanding its setup, navigation, and customization options, users can leverage the system to ensure they never miss an important message and maintain seamless communication. Whether you’re in the office or accessing messages remotely, the system’s flexibility and advanced features provide all the tools needed to stay connected.

