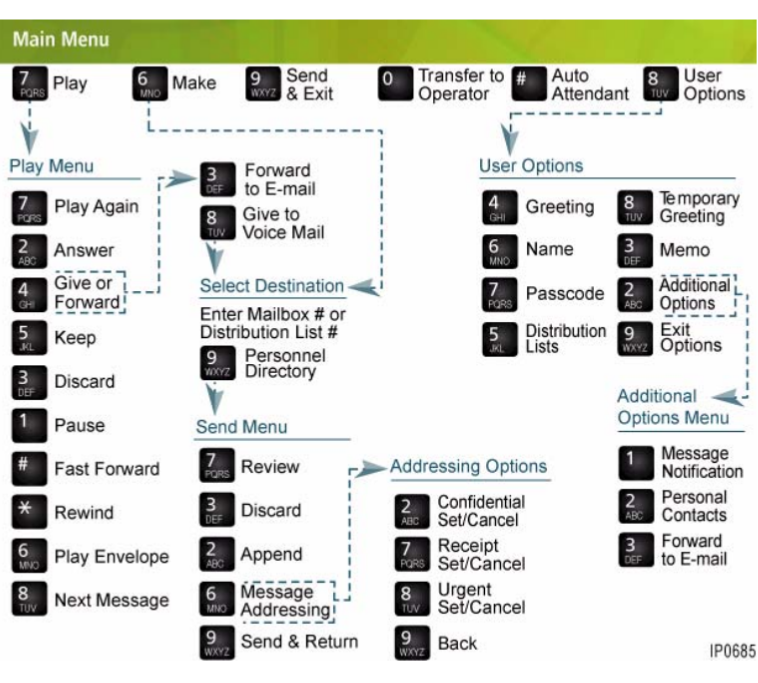
The Mitel SX-200 IP Communications Platform offers a comprehensive voicemail system that allows users to manage their messages and personalize their mailbox settings effectively. One of the key features of this system is the “User Options” menu, which provides a range of customization tools to enhance your voicemail experience. This article will guide you through the various user options available in the SX-200 voicemail system, helping you tailor your mailbox to meet your specific needs.
Table of Contents
1. Accessing the User Options Menu
To begin customizing your voicemail settings, you first need to access the User Options menu:
- Call the voicemail system and log into your mailbox by entering your passcode.
- Once logged in, press
4to enter the User Options menu.
From here, you can choose from a variety of settings to manage your voicemail preferences.
2. Changing Your Passcode
Your passcode is the key to accessing your voicemail securely. For security reasons, it’s recommended to change your passcode regularly.
Steps to Change Your Passcode:
- Press
2for the Passcode option within the User Options menu. - Enter a new passcode that matches the required length (typically 4-6 digits).
- Re-enter the passcode to confirm.
Important Tips:
- Your passcode must differ from the previous one.
- Avoid using simple sequences like
1234or repetitive digits like1111to enhance security. - Make sure you remember your new passcode, as you’ll need it every time you access your mailbox.
3. Managing Mailbox Greetings
Your mailbox greeting is what callers hear when they reach your voicemail. The SX-200 system allows you to set both permanent and temporary greetings.
3.1. Recording a Permanent Greeting
Your permanent greeting is used by default whenever you’re unavailable to take a call.
Steps to Record or Update Your Permanent Greeting:
- Press
1for the Greeting option in the User Options menu. - Record your greeting after the tone and press any key to stop.
- Press
#to accept,1to review, or2to discard and re-record.
3.2. Setting Up a Temporary Greeting
Temporary greetings are ideal for specific situations, such as vacations or business trips. This greeting will override your permanent greeting for a specified duration.
Steps to Record a Temporary Greeting:
- Press
2for Temporary Greeting in the User Options menu. - Enter the number of days (from 1 to 99) you want the greeting to be active.
- Record your temporary greeting and press any key to stop.
- Press
#to accept,1to review, or2to discard and re-record.
Once the specified time period ends, your mailbox will automatically revert to the permanent greeting.
4. Setting Up Distribution Lists
If you frequently send voicemail messages to multiple recipients, creating distribution lists can save you time.
Steps to Create or Modify Distribution Lists:
- Press
3for Distribution Lists in the User Options menu. - Enter a distribution list number (e.g., 050 to 059 for personal lists).
- Press
1to add mailbox numbers to the list. - Enter the mailbox numbers you want to include, pressing
#after each entry. - Press
#when finished to save the list.
Reviewing or Deleting List Entries:
- To review a distribution list, press
2in the Distribution Lists menu. - To delete an entry, press
3and then enter the mailbox number you wish to remove.
Distribution lists are especially useful for team updates, department announcements, or any situation where the same message needs to be sent to multiple people.
5. Using Message Notification
Message Notification allows the system to alert you when you receive new messages, whether you’re at your desk or away.
Steps to Set Up Message Notification:
- Press
5for Message Notification in the User Options menu. - Choose when you want to be notified:
- Press
1for notifications during business hours. - Press
2for notifications outside business hours. - Press
3for round-the-clock notifications. - Press
4to disable notifications.
- Select the type of messages to be notified about:
- Press
1for all messages. - Press
2for urgent messages only.
- Enter the notification number (internal extension, external number, or pager).
This feature ensures that you’re always informed about important messages, even when you’re not at your desk.
6. Forwarding Messages to Email
For added convenience, the SX-200 system can forward your voicemail messages to your email account.
Steps to Enable Email Forwarding:
- Press
6for Forward to Email in the User Options menu. - Press
1to enable Always Forward to Email, or press2to disable it (for manual forwarding). - Press
1to enable Delete After Forwarding, or press2to keep messages in your mailbox after forwarding.
Note: If you disable automatic forwarding, you can manually forward individual messages to your email by pressing 3 after listening to a message and selecting the email option.
7. Recording a Memo
The Memo feature allows you to record a message for yourself, which you can listen to later.
Steps to Record a Memo:
- Press
7for Memo in the User Options menu. - Record your memo after the tone and press any key to stop.
- The memo will be saved in your mailbox like a regular voicemail message, allowing you to access it later.
This feature is useful for quickly jotting down reminders or important information without needing a pen and paper.
8. Conclusion
The User Options menu in the SX-200 voicemail system provides a powerful set of tools for personalizing and managing your mailbox. By understanding and utilizing these options, you can optimize your voicemail experience, ensuring that your communications are handled efficiently and that you never miss an important message. Whether you’re setting up custom greetings, managing message notifications, or organizing distribution lists, the User Options menu empowers you to take full control of your voicemail system.

