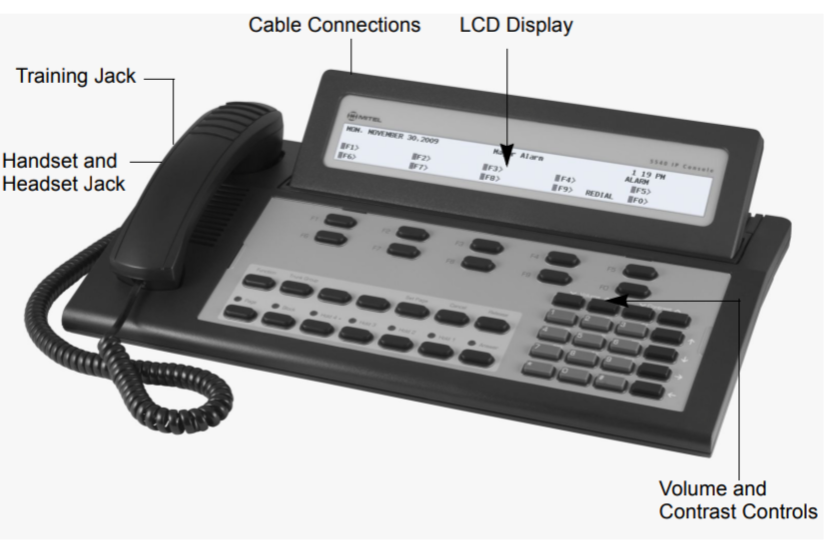
The Mitel SX-200 Voicemail System is designed to streamline communication and message management in hotel and motel environments. A crucial component of this system is the Front Desk Mailbox, which allows front desk attendants to manage guest mailboxes, access messages, and handle various administrative tasks efficiently. This guide provides detailed instructions on setting up and managing the Front Desk Mailbox to ensure smooth operation and enhance guest satisfaction.
Table of Contents
1. Getting Started with the Front Desk Mailbox
The Front Desk Mailbox is your gateway to managing the voicemail needs of guests and ensuring that their messages are handled promptly. Before you begin, make sure you have the following information:
- Message Center Extension: This is the number you dial to access the voicemail system.
- Front Desk Mailbox Number: Typically, this is the same as the front desk extension number.
- Default Passcode: Provided by your system administrator, this code allows initial access to the mailbox.
2. Setting Up the Front Desk Mailbox
2.1. Changing the Default Passcode
Security is essential, so the first step is to change the default passcode to a unique one:
- Dial the Message Center Number: Lift the handset and dial the number provided.
- Enter the Default Passcode: Typically, the default passcode is all 1’s.
- Follow the Prompts: You’ll be prompted to change the passcode. Enter a new passcode with the same number of digits as the default, avoiding simple sequences like all 1’s.
- Confirm the New Passcode: Re-enter the new passcode when prompted.
2.2. Recording Your Greeting
The greeting is what callers hear when they reach the front desk voicemail:
- Record the Greeting: After setting the passcode, the system will prompt you to record a greeting. Keep it short and professional, such as:
- “You have reached the front desk of [Hotel Name]. We can’t answer the phone right now, so please leave your name, number, and a short message. We will get back to you as soon as possible.”
- Review and Accept: Press the appropriate key to review the recording. If satisfied, accept the greeting. Otherwise, you can re-record it.
3. Accessing the Front Desk Mailbox Menu
Once your mailbox is set up, you can access a variety of options:
- Dial the Message Center Number: Start by lifting the handset and dialing the message center number.
- Enter the Passcode: Input the passcode you’ve set up.
- Navigate the Menu: After logging in, you’ll have access to several options:
- Login for Guest: Assist guests in accessing their voicemail messages.
- Check-in: Set a guest mailbox status to “checked-in,” allowing it to receive new messages.
- Check-out: Set a guest mailbox status to “checked-out,” preventing it from receiving new messages.
- Language Selection: (If available) Choose the language for voicemail prompts.
- Move: Transfer a guest’s mailbox messages and greeting to another room.
- Access Front Desk Mailbox Options: Manage messages, change the greeting, or update the passcode for the front desk mailbox.
Note: After accessing the Front Desk Mailbox Options, you must exit and log back in to return to the main menu.
4. Helping Guests Access Their Messages
If a guest needs assistance accessing their voicemail messages:
- Place the Guest on Hold: Use the Trans/Conf key to place the guest on hold.
- Dial the Message Center Number: While the guest is on hold, dial the message center number.
- Enter the Passcode: Log into the front desk mailbox.
- Assist the Guest: Press the appropriate key to transfer the guest directly to their voicemail.
This process ensures that guests can easily retrieve their messages without confusion or delay.
5. Managing Guest Mailbox Status
5.1. Checking Guests In
When a guest checks in, their mailbox should be set to “checked-in” so they can receive messages:
- Access the Message Center: Dial the message center number and log in with the passcode.
- Set to Checked-In: Press the key for “Check-in” and enter the guest’s mailbox number.
- Language Selection: If prompted, choose the language for the voicemail prompts (if applicable).
5.2. Checking Guests Out
When a guest checks out, set their mailbox to “checked-out” to prevent new messages from being received:
- Access the Message Center: Dial the message center number and log in with the passcode.
- Set to Checked-Out: Press the key for “Check-out” and enter the guest’s mailbox number.
Messages from the previous guest are deleted when the mailbox status changes from “checked-out” to “checked-in.”
6. Moving a Guest’s Mailbox
If a guest moves to another room, their voicemail messages and greetings must also be moved:
- Access the Message Center: Dial the message center number and log in with the passcode.
- Initiate the Move: Press the key for “Move” and enter the current mailbox number.
- Enter the New Room Number: Provide the mailbox number for the new room.
The guest’s messages and greeting will be transferred to the new room’s mailbox.
7. Accessing and Managing Guest Mailboxes
You can access a guest’s mailbox to check messages, set greetings, or schedule wake-up calls:
- Dial the Message Center Number: Start by dialing the message center number.
- Enter the Passcode: Log in with the front desk mailbox passcode.
- Access the Guest Mailbox: Press the appropriate key and enter the guest’s mailbox number.
- Manage the Mailbox: Follow the prompts to manage messages, set a greeting, or schedule a wake-up call.
Conclusion
The Front Desk Mailbox in the Mitel SX-200 Voicemail System is a powerful tool that helps hotel staff efficiently manage guest communications. By following this guide, you can ensure that your front desk operations run smoothly, providing excellent service to your guests and maintaining an organized voicemail system. Whether you’re setting up the mailbox, assisting guests, or managing messages, these instructions will help you navigate the system with confidence.

